Showing posts with label organic garden. Show all posts

8 Steps to Growing An Organic Garden


There's something about this time of year that always excites me. I don't know if it's the potential that seems to blossom in the Spring, or the green buds peeking through the ground. Whatever it is I get pumped when I can dig my hands in the dirt, and start planting!

Creating your own organic garden can be a fun weekend project that takes little more than some elbow grease and a plan. Whether you are looking to put in a large plot or want to start out small, organic gardening can be as easy as pie...maybe even sweet potato!

So what is an organic garden? Well, its one that's cultivated without the use of fertilizers or herbicides to promote the growth of fruits and vegetables. Instead sunlight, organic soil, seeds and water can turn your backyard, or apartment balcony into an organic haven. From Organic Gardening:
When you garden organically, you think of your plants as part of a whole system within nature that starts in the soil and includes the water supply, people, wildlife and even insects.

Step 1: Prepare the Soil
Gardening soil isn't just dirt. In order to ensure your plants get all they need to flourish, you must first start with a nutrient rich base. If you need help determining the quality of your soil you can have it tested by your local agricultural office. Be sure to tell them you are planting an organic garden so they can provide the best mix of ingredients to start you off. The best time to test is in the fall, whatever you add in will have time to enrich the soil over the winter, and make for a beautiful harvest.

Step 2: Compost
You'll need to make sure you have a good mixture of organic matter like leaves or grass clippings which can be acquired right from your backyard. Decayed plants, vegetable scrapes from your kitchen and egg shells can provide a good start to your composting bin. Mushroom dirt is also a rich addition to your soil by improving drainage of clay dirt and increasing microbial activity. Stay tuned for our upcoming article on Composting 101.

Step 3: Choose the Right Plants
Picking the right planets for your geographic climate is an important step in planning your garden. While grapes may run wild in the North West, you'll find they are much harder to develop in colder North Eastern states. Choose vegetation that is well suited for the amount of light, moisture, and soil quality your garden will receive. Look for seeds or plants from your local farmers market that were raised without chemical fertilizers, and if possible were not genetically modified. Real food = Real Health.

Step 4: Give Your Crops Space
Plants you are harvesting should be grouped together in raised beds that can protect them from foot traffic. Grouping also reduces weeding and water waste. But be aware of the amount of space each plant will need to avoid over crowding and casting too many shadows.

Step 5: Water, Water, Water...but not too much
The best time to water your garden is in the morning when it is still cool, this leads to less evaporation and water consumption. If you water at night the plants may stay too damp and cause fungus growth. Always water the roots to avoid damaging leaves and flowers. Experts recommend substantial infrequent watering---about 1 inch of water per week.

Step 6: Weeding
Probably the least fun step of gardening is getting rid of those pesky plants that steal nutrients, water and sunlight from you beautiful food. But, no matter how time consuming, weeding is a necessary step to promote the full growth of your garden. As you are on your knees just think of all the fresh air and Vitamin D you'll be getting!

Step 7: Protect Your Plants
Whether its deer, ground hogs, or caterpillars, nature’s creatures always seem to find a way to nibble on or even eviscerate lovely gardens. Besides fences, netting, and Marigolds to ward off larger animals, there are some chemical-free ways to keep crawling critters at bay. The Daily Green suggests:
Organic weapons include Bacillus thuringiensis, a naturally occurring bacteria that disrupts the digestion of caterpillars and other leaf-eaters. You can also use horticultural oils, insecticidal soaps and garlic and/or hot pepper sprays.
Step 8: Harvesting
You’ve tilled, planted, watered, and weeded, so now its time to reap the rewards! Your organic fresh fruits and veggies can make mealtime a fun event. Have your kids pick from the garden right before preparing dinner---they'll make the connection that real food can be delicious. Share your harvest by giving a gift basket to family or neighbors. If you have an overabundant crop you can always freeze or can any leftovers until its time for next years batch.

However it's used, your organic garden can be a healthy and delectable labor of love.

Have you started your garden yet? Share your tips in the comments section.


Happy Spring from Granolaville,


Fresh Idea Friday: 7 Steps to Making 'Black Gold'


Cow manure, nutritious soil, sunlight and water. That and some patience is all you need to have the garden of your dreams. Unfortunately, I pretty much suck at being patient.

So the idea that I have to "make" nutrient dense dirt for an entire year before I get to use any of it, is not encouraging. It is, however, comforting to know that scraps from your kitchen and yard can turn your home garden from sad looking vegetation to a delicious harvest to share with family and friends.

My family and I started our first garden last year, very later in the season. By the time we got our raised beds down and a fence built it was August.


Because we procrastinated couldn't find the time to set up our garden early in the season, it really limited what we could grow. But after a few weeks we had tomatoes, green beans, green peppers, and obnoxiously large pumpkins. (Never plant pumpkins with other fruits and veggies, they take over like some tentacled garden monster)


SO although we got a beautiful amount of veggies our first time out, I was determined this year to make it bigger and better.

Where I live, in the North East, the soil can be very rich in some places, while other areas are clay-like or have an over saturation of water. In my own "Granolaville" there are acres of local farms producing the freshest organic fruits and vegetables. The key to their success...using organic compost.

As beginners my hubby and I headed down to the local Lowe's to get bags AND bags of organic potting mix and compost. But you can just as easily make your own compost at home which is not only great for your plants but the environment as well.

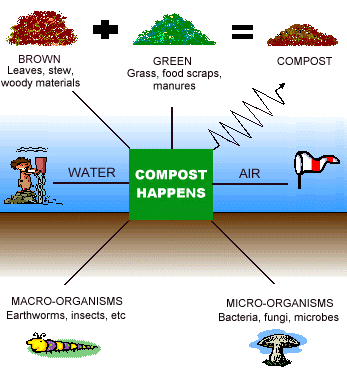
Composting involves mixing yard and household organic waste in a pile or bin and providing conditions that encourage decomposition. The decomposition process is fueled by millions of microscopic organisms (bacteria, fungi) that take up residence inside your compost pile, continuously devouring and recycling it to produce a rich organic fertilizer and valuable soil.

Here's what you need to know to create your own "gold dirt":

1. Pick a Location

Your compost pile should be in a place that has direct sunlight and access to water, but is far enough from your home to avoid the smell of decaying food.

2. Find a Container

Whether you are starting off small or large, having a place to store your compost material is key. For indoor collections I suggest an old coffee can or any small container with a lid. You can place a filter between the lid and the can to prevent odors from escaping.

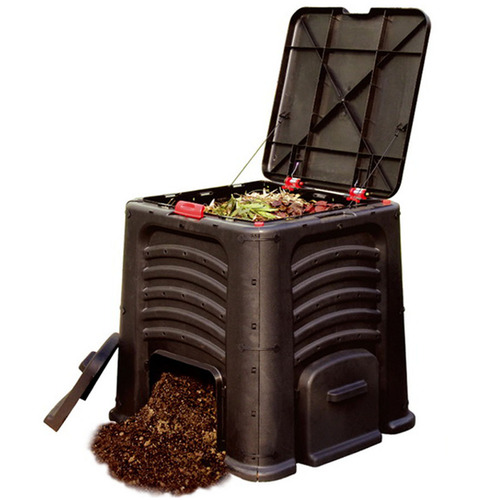
It's really important to have enough room to move your compost material around to speed up the decomposition process. For your outdoor pile you can cut the bottom of an old garbage can (so it is in contact with the ground and worms, who will work to aerate the soil ), purchase a turning compost bin, or one with sliding doors like the one we got from Lowes.


3. Layer it.

Start with small twigs or branches. Efficient decomposition requires nitrogen (kitchen scraps or anything green, like fresh cut grass), carbon (yard waste, dried leaves, anything brown), oxygen (air), and water. The perfect ratio of carbon to nitrogen is 3/1.

4. Water.

Your compost should be moistened but not saturated to the point where microbes that breakdown your waste can't survive.

5. Aerate

Turn your soil every couple of days to allow oxygen to get through the entire pile which promotes decomposition. Adding earthworms also helps.

6. Put a Lid on it

In order to lock in moisture and prevent animals from getting in, a sturdy lid is recommended.

7. Ready to Use

Composting is complete when all the soil is a dark rich earthy color. This process can take anywhere from a few months to a year depending on how big your pile is.

List of Items to Compost
  • Fruits and Vegetable scraps
  • Coffee grounds and tea leaves
  • Cow manure (DO NOT USE OTHER PET FECES, IT WILL BECOME TOXIC)
  • Rinsed eggs shells
  • Shredded newspaper
  • Sawdust
  • Any kind of seed or pit chopped up to prevent growth
  • Old breakfast cereal or stale bread
  • Leftover cooked pasta
  • Dryer lint
  • Non Styrofoam egg cartons
  • Paper napkins, towels or plates (without plastic coating)
  • Anything you sweep up from your kitchen floor
 Do not compost meat, bones, fat, grease, dairy products, or pet waste.

Good luck, and happy composting!!!
What are your composting tips? Share in the comments section below!

Getting dirty in Granolaville,


Resources:
http://www.lowes.com/cd_How+to+Compost_1280854673_
http://healthychild.org/blog/comments/10_quick_steps_to_composting/
http://www.growandmake.com/sustainable-living-blog/get-started-composting
http://www.care2.com/greenliving/80-items-you-can-compost.html?page=3