Showing posts with label vegetables. Show all posts

8 Steps to Growing An Organic Garden


There's something about this time of year that always excites me. I don't know if it's the potential that seems to blossom in the Spring, or the green buds peeking through the ground. Whatever it is I get pumped when I can dig my hands in the dirt, and start planting!

Creating your own organic garden can be a fun weekend project that takes little more than some elbow grease and a plan. Whether you are looking to put in a large plot or want to start out small, organic gardening can be as easy as pie...maybe even sweet potato!

So what is an organic garden? Well, its one that's cultivated without the use of fertilizers or herbicides to promote the growth of fruits and vegetables. Instead sunlight, organic soil, seeds and water can turn your backyard, or apartment balcony into an organic haven. From Organic Gardening:
When you garden organically, you think of your plants as part of a whole system within nature that starts in the soil and includes the water supply, people, wildlife and even insects.

Step 1: Prepare the Soil
Gardening soil isn't just dirt. In order to ensure your plants get all they need to flourish, you must first start with a nutrient rich base. If you need help determining the quality of your soil you can have it tested by your local agricultural office. Be sure to tell them you are planting an organic garden so they can provide the best mix of ingredients to start you off. The best time to test is in the fall, whatever you add in will have time to enrich the soil over the winter, and make for a beautiful harvest.

Step 2: Compost
You'll need to make sure you have a good mixture of organic matter like leaves or grass clippings which can be acquired right from your backyard. Decayed plants, vegetable scrapes from your kitchen and egg shells can provide a good start to your composting bin. Mushroom dirt is also a rich addition to your soil by improving drainage of clay dirt and increasing microbial activity. Stay tuned for our upcoming article on Composting 101.

Step 3: Choose the Right Plants
Picking the right planets for your geographic climate is an important step in planning your garden. While grapes may run wild in the North West, you'll find they are much harder to develop in colder North Eastern states. Choose vegetation that is well suited for the amount of light, moisture, and soil quality your garden will receive. Look for seeds or plants from your local farmers market that were raised without chemical fertilizers, and if possible were not genetically modified. Real food = Real Health.

Step 4: Give Your Crops Space
Plants you are harvesting should be grouped together in raised beds that can protect them from foot traffic. Grouping also reduces weeding and water waste. But be aware of the amount of space each plant will need to avoid over crowding and casting too many shadows.

Step 5: Water, Water, Water...but not too much
The best time to water your garden is in the morning when it is still cool, this leads to less evaporation and water consumption. If you water at night the plants may stay too damp and cause fungus growth. Always water the roots to avoid damaging leaves and flowers. Experts recommend substantial infrequent watering---about 1 inch of water per week.

Step 6: Weeding
Probably the least fun step of gardening is getting rid of those pesky plants that steal nutrients, water and sunlight from you beautiful food. But, no matter how time consuming, weeding is a necessary step to promote the full growth of your garden. As you are on your knees just think of all the fresh air and Vitamin D you'll be getting!

Step 7: Protect Your Plants
Whether its deer, ground hogs, or caterpillars, nature’s creatures always seem to find a way to nibble on or even eviscerate lovely gardens. Besides fences, netting, and Marigolds to ward off larger animals, there are some chemical-free ways to keep crawling critters at bay. The Daily Green suggests:
Organic weapons include Bacillus thuringiensis, a naturally occurring bacteria that disrupts the digestion of caterpillars and other leaf-eaters. You can also use horticultural oils, insecticidal soaps and garlic and/or hot pepper sprays.
Step 8: Harvesting
You’ve tilled, planted, watered, and weeded, so now its time to reap the rewards! Your organic fresh fruits and veggies can make mealtime a fun event. Have your kids pick from the garden right before preparing dinner---they'll make the connection that real food can be delicious. Share your harvest by giving a gift basket to family or neighbors. If you have an overabundant crop you can always freeze or can any leftovers until its time for next years batch.

However it's used, your organic garden can be a healthy and delectable labor of love.

Have you started your garden yet? Share your tips in the comments section.


Happy Spring from Granolaville,


Wellness Wednesday: 5 Ways to Save Bees & How it Can Affect Your Health

"If the bee disappears from the surface of the earth, man would have no more than four years to live." ~ Albert Einstein


Last week I had the pleasure of going on a field trip with my son and his kindergarten class to a local farm. Our mission...learn about bees!

As someone who has gotten stung numerous times by those little buzzing creatures, I was not SUPER thrilled about this adventure. For something so small, they can cause a lot of pain, especially if you are allergic to them. But, one of the perks of working from home is the flexibility I have to do these events with my kid...so I braved the cold (and my fears of being stung) and made my way to the farm.

I had heard over the years the importance of honey bees to our food supply, and how pesticides were threatening their survival, but I had never been properly schooled on how important they actually are.


Did you know.....

Apples, peaches, pears, blueberry, raspberry, blackberry, almonds, Brazil nuts, pumpkins – all squashes, avocado mango, star fruit and cocoa…and MUCH more! (Basically everything natural and nutritious)

Not impressed? HERE's the full list.

I had no idea that bee's were SUCH an important part of our ecosystem and how much they contribute to our health! With this new information I wanted to find out how we all can help save the bee population so we don't lose the precious crops we need to survive.

1. GO WILD!!

Although protecting your home garden from pests and insects is important, also having a space that is animal friendly will help bee's to establish a hive. So let some of your plants run wild, and in turn those busy bees will help pollinate your food.

2. Put Away the Chemicals

We know that modern insecticides are deadly to bees, and are responsible for Colony Collapse Disorder. It will be better for their health, and yours, if we all just stop spraying this stuff.

3. Avoid Modified Seeds

Many farmers now buy seeds coated with clothianidin and other systemic insecticides. These can cause the entire plant to become toxic to bees and other insects. 

4. Buy Organic

Besides the numerous health benefits, tradionally organic farmers will also use natural farming methods that are bee-friendly.

5. Support Local Honey Farms

Industrial sized bee operations are more concerned with the input, rather than the output. You can find local honey at farmers markets and groceries stores. You'll be putting money back into your community while helping to maintain your local bee population.

The survival of bees is undeniably connected to our own survival. Help protect real food by protecting bees.

Did you know the importance of honey bees?

Embracing the 'Buzz' in Granolaville,


Fresh Idea Friday: 7 Steps to Making 'Black Gold'


Cow manure, nutritious soil, sunlight and water. That and some patience is all you need to have the garden of your dreams. Unfortunately, I pretty much suck at being patient.

So the idea that I have to "make" nutrient dense dirt for an entire year before I get to use any of it, is not encouraging. It is, however, comforting to know that scraps from your kitchen and yard can turn your home garden from sad looking vegetation to a delicious harvest to share with family and friends.

My family and I started our first garden last year, very later in the season. By the time we got our raised beds down and a fence built it was August.


Because we procrastinated couldn't find the time to set up our garden early in the season, it really limited what we could grow. But after a few weeks we had tomatoes, green beans, green peppers, and obnoxiously large pumpkins. (Never plant pumpkins with other fruits and veggies, they take over like some tentacled garden monster)


SO although we got a beautiful amount of veggies our first time out, I was determined this year to make it bigger and better.

Where I live, in the North East, the soil can be very rich in some places, while other areas are clay-like or have an over saturation of water. In my own "Granolaville" there are acres of local farms producing the freshest organic fruits and vegetables. The key to their success...using organic compost.

As beginners my hubby and I headed down to the local Lowe's to get bags AND bags of organic potting mix and compost. But you can just as easily make your own compost at home which is not only great for your plants but the environment as well.

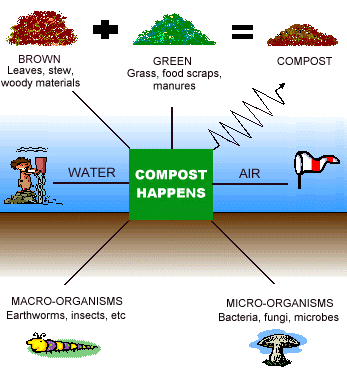
Composting involves mixing yard and household organic waste in a pile or bin and providing conditions that encourage decomposition. The decomposition process is fueled by millions of microscopic organisms (bacteria, fungi) that take up residence inside your compost pile, continuously devouring and recycling it to produce a rich organic fertilizer and valuable soil.

Here's what you need to know to create your own "gold dirt":

1. Pick a Location

Your compost pile should be in a place that has direct sunlight and access to water, but is far enough from your home to avoid the smell of decaying food.

2. Find a Container

Whether you are starting off small or large, having a place to store your compost material is key. For indoor collections I suggest an old coffee can or any small container with a lid. You can place a filter between the lid and the can to prevent odors from escaping.

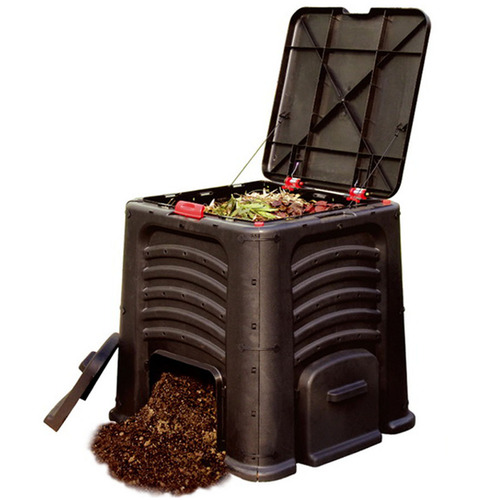
It's really important to have enough room to move your compost material around to speed up the decomposition process. For your outdoor pile you can cut the bottom of an old garbage can (so it is in contact with the ground and worms, who will work to aerate the soil ), purchase a turning compost bin, or one with sliding doors like the one we got from Lowes.


3. Layer it.

Start with small twigs or branches. Efficient decomposition requires nitrogen (kitchen scraps or anything green, like fresh cut grass), carbon (yard waste, dried leaves, anything brown), oxygen (air), and water. The perfect ratio of carbon to nitrogen is 3/1.

4. Water.

Your compost should be moistened but not saturated to the point where microbes that breakdown your waste can't survive.

5. Aerate

Turn your soil every couple of days to allow oxygen to get through the entire pile which promotes decomposition. Adding earthworms also helps.

6. Put a Lid on it

In order to lock in moisture and prevent animals from getting in, a sturdy lid is recommended.

7. Ready to Use

Composting is complete when all the soil is a dark rich earthy color. This process can take anywhere from a few months to a year depending on how big your pile is.

List of Items to Compost
  • Fruits and Vegetable scraps
  • Coffee grounds and tea leaves
  • Cow manure (DO NOT USE OTHER PET FECES, IT WILL BECOME TOXIC)
  • Rinsed eggs shells
  • Shredded newspaper
  • Sawdust
  • Any kind of seed or pit chopped up to prevent growth
  • Old breakfast cereal or stale bread
  • Leftover cooked pasta
  • Dryer lint
  • Non Styrofoam egg cartons
  • Paper napkins, towels or plates (without plastic coating)
  • Anything you sweep up from your kitchen floor
 Do not compost meat, bones, fat, grease, dairy products, or pet waste.

Good luck, and happy composting!!!
What are your composting tips? Share in the comments section below!

Getting dirty in Granolaville,


Resources:
http://www.lowes.com/cd_How+to+Compost_1280854673_
http://healthychild.org/blog/comments/10_quick_steps_to_composting/
http://www.growandmake.com/sustainable-living-blog/get-started-composting
http://www.care2.com/greenliving/80-items-you-can-compost.html?page=3

Taste It Tuesday: How Safe is Your Produce?

Have food companies roped you into believing everything you put in your body needs to be "Organic"? Labeling of our food can be very confusing. Terms like "All Natural", "Organic", "Natural Flavoring", and "Certified Organic" are thrown around all willy-nilly, its hard to differentiate what we should buy vs fattening these companies pockets.

I'm guilty of being a sucker to clever marketing. I once bought a brand of "Natural Whole Grain" bread thinking I was giving my family a good source of fiber and carbohydrates, only to read the back label to see that High Fructose Corn Syrup was the second ingredient. I don't know about you, but I don't think I want buckets of genetically modified corn sugar being dumped into my family's bread.

So how do you know which food should be organic and which are safe when traditionally grown? Well that's a trick question. The simple answer is NONE of our food should have added chemicals, whether it is being grown on a farm in the Mid-West or in our own backyard.

I know that this idealistic approach to food is not economically or geographically feasible for many people. Even if you are lucky enough to live near a grocery store that has USDA Certified Organic produce stocked on its shelves, the price of these items can border on extortion. (I just paid $5 for a container Organic strawberries).

Though the price of purchasing Organic food can deter many people from even considering it, just know that health benefits can far out weigh the dent in your wallet. Because organic farmers don't get subsidies from the government, and have a more labor intensive process to grow their food, their prices reflect the true cost of their work.

O.K. Getting back to which food to buy organically. This question can actually be answered by finding out which foods have the highest amount of pesticide and herbicide contamination. Each year the Environmental Working Group releases a list of the most contaminated foods, aptly titled the "Dirty Dozen".
 
By switching to the USDA Organic varieties of these food you can greatly reduce your chemical intake by as much as 80% and avoid spending extra cash on food that doesn't necessarily need to be organic. 

If buying organic food is completely out of your budget try this simple natural food wash to help kill bacteria and dissolve wax or pesticides that remain on your foods.

Natural Veggie Wash
 
Ingrediants:
A spray bottle with equal parts vinegar and water, 2 tablespoons salt.

Directions:
For thick skins (apples) spray directly on item, rub in, then rinse with water.
For soft skins (peaches) place in a bowl to soak for 2 minutes, then rinse with water.
 
If you want to indulge in some produce that isn't covered in toxic chemicals also check out the "Clean 15" in this handy little print out.


What kinds of organic food do you buy? Let me know in the comments section below!

Fresh and Clean in Granolaville, 


Resources:

http://www.whatsonmyfood.org/food.jsp?food=NE
http://www.thedailygreen.com/
http://www.ewg.org/


Taste it Tuesday: Storing Fruits and Veggies From A-Z

Flicker

I hate to admit this. But, until recently, I had NO idea how to store my fruit and veggies. I remember when my husband and I got our first apartment I was pretty new to the whole being "domestic" role I had taken on. I knew how to cook a handful of things but my skills were pretty limited.

After buying our week's worth of groceries, I put a sack of potatoes in the Lazy Susan in the corner of my kitchen because I remembered something about potatoes needing to be stored in a dark cool place. Being that I dreaded making mashed potatoes (I knew that they would never live up to my mother-in-law's recipe) I forgot all about them. A few weeks...ok months later, I noticed a brown liquid leaking from underneath my cabinets. When I spun the door open my potatoes had turned into a mushy brown science experiment, oozing a rotten smelly liquid, and sprouting root-like tentacles from its skin.

From that moment on I put EVERYTHING in the refrigerator in fear of a repeat of the potato monster. If you have no idea how those "green" bags work, or where to put your squash, or how to keep your produce from being tossed in the trash read on, this post is for YOU!

 First thing you need to know is that all fruits and vegetables give off a natural gas called ethylene gas. The release of this gas causes your food to ripen and then rot if not stalled. Each fruit and vegetable gives off different amounts of ethylene, which can cause any food around them to ripen at various speeds. Also once mold begins to grow, it can quickly spread to your others foods (one bad apple CAN really spoil the bunch), so toss out any that has already gone bad. Lastly, temperature can vastly effect how quickly your food turns to monstrous mush, placing an item in the refrigerator can increase the life of your foods.

Since I was a novice at this whole storage thing, I enlisted the help of a fellow blogger, Erin, at My Thirty Spot on how to store all your fruits and veggies, from A-Z.


Vegetables
Flicker
Artichokes‐ place in an airtight container sealed, with light moisture.
Asparagus‐ place them loosely in a glass or bowl upright with water at room temperature. (Will keep for a week outside the fridge)
Avocados‐ place in a paper bag at room temp. To speed up their ripening‐ place an apple in the bag with them.
Arugula‐ arugula, like lettuce, should not stay wet! Dunk in cold water and spin or lay flat to dry. Place dry arugula in an open container, wrapped with a dry towel to absorb any extra moisture.
Basil‐ is difficult to store well. Basil does not like the cold, or to be wet for that matter. The best method here is an airtight container/jar loosely packed with a small damp piece of paper inside‐left out on a cool counter.
Beans (shelling)‐ open container in the fridge, eat ASAP. Some recommend freezing them if not going to eat right away
Beets‐ cut the tops off to keep beets firm, (be sure to keep the greens!) by leaving any top on root vegetables draws moisture from the root, making them loose flavor and firmness. Beets should be washed and kept in and open container with a wet towel on top.
Broccoli‐ place in an open container in the fridge or wrap in a damp towel before placing in the fridge.
Broccoli Rabe‐ left in an open container in the crisper, but best used as soon as possible.
Brussels Sprouts‐ If bought on the stalk leave them on that stalk. Put the stalk in the fridge or leave it on a cold place. If they’re bought loose store them in an open container with a damp towel on top.
Cabbage‐ Left out on a cool counter is fine up to a week, in the crisper otherwise. Peel off outer leaves if they start to wilt. Cabbage might begin to loose its moisture after a week , so, best used as soon as possible.
Carrots‐ Cut the tops off to keep them fresh longer. Place them in closed container with plenty of moisture, either wrapped in a damp towel or dunk them in cold water every couple of days if they’re stored that long.
Cauliflower‐ will last a while in a closed container in the fridge, but they say cauliflower has the best flavor the day it’s bought.
Celery‐ Does best when simply places in a cup or bowl of shallow water on the counter. If you want to keep it in the refrigerator, like I do, wrap it in tin foil. It will stay crisp for weeks.
Corn‐ Leave husk on in an open container if you must, but corn really is best eaten sooner rather than later for maximum flavor.
Cucumber‐ wrapped in a moist towel in the fridge. If you’re planning on eating them within a day or two after buying them they should be fine left out in a cool room.
Eggplant‐ does fine left out in a cool room. Don’t wash it, eggplant doesn’t like any extra moisture around its leaves. For longer storage‐ place loose, in the crisper.
Fava Beans‐ place in an air tight container.
Fennel‐ if used within a couple days after it’s bought fennel can be left out on the counter, upright in a cup or bowl of water (like celery). If wanting to keep longer than a few days place in the fridge in a closed container with a little water.
Garlic‐ store in a cool, dark, place.
Green garlic‐an airtight container in the fridge or left out for a day or two is fine, best before dried out.
Greens‐ remove any bands, twist ties, etc. most greens must be kept in an air‐tight container with a damp cloth‐ to keep them from drying out. Kale, collards, and chard even do well in a cup of water on the counter or fridge.
Green Beans‐ they like humidity, but not wetness. A damp cloth draped over an open or loosely closed container.
Green Tomatoes‐ store in a cool room away from the sun to keep them green and use quickly or they will begin to color.
Herbs- a closed container in the fridge to kept up to a week. Any longer might encourage mold.
Lettuce‐ Keep damp in an airtight container in the fridge.
Leeks‐leave in an open container in the crisper wrapped in a damp cloth or in a shallow cup of water on the counter (just so the very bottom of the stem has water).
Okra‐ Doesn’t like humidity. So a dry towel in an airtight container. Doesn’t store that well, best eaten quickly after purchase
Onion‐ store in a cool, dark and dry, place‐ good air circulation is best, so don’t stack them.
Mushrooms - Keep mushrooms in the refrigerator in its original wrapping. If you are using some of the mushrooms, try to open a corner of the plastic wrap and just take what you need. Then cover with a paper towel and cover with more plastic wrap and place back into the refrigerator.
Parsnips‐ Place in an open container in the crisper, or like a carrot, wrapped in a damp cloth in the fridge.
Peppers- (Sweet/ Hot/ Bell) Store in a plastic bag before placing in crisper or refrigerator. Green peppers stay fresh longer than orange or red peppers.
Potatoes‐ (like garlic and onions) store in cool, dark place

Radishes‐ Remove the greens (store separately) so they don’t draw out excess moisture from the roots and place them in a open container in the fridge with a wet towel placed on top.
Rhubarb‐ Wrap in a damp towel and place in an open container in the refrigerator.
Rutabagas‐ An ideal situation is a cool, dark, humid root cellar or a closed container in the crisper to keep their moisture in.
Snap peas‐ refrigerate in an open container
Spinach‐ store loose in an open container in the crisper, cool as soon as possible. Spinach loves to stay cold.
Spring Onions‐ Remove any band or tie and place in the crisper.
Summer Squash‐ Does fine for a few days if left out on a cool counter, even after cut.
Sweet peppers‐ Only wash them right before you plan on eating them as wetness decreases storage time. Store in a cool room to use in a couple a days, place in the crisper if longer storage needed.
Sweet Potatoes‐ Store in a cool, dark, well‐ventilated place. Never refrigerate‐‐sweet potatoes don’t like the cold.
Tomatoes‐ Never refrigerate. Depending on ripeness, tomatoes can stay for up to two weeks on the counter. To hasten ripeness place in a paper bag with an apple.
Turnips‐ Remove the greens (store separately) same as radishes and beets, store them in an open container with a moist cloth.
Winter Squash‐ Store in a cool, dark, well ventilated place. Many growers say winter squashes get sweeter if they’re stored for a week or so before eaten.
Zucchini‐ Does fine for a few days if left out on a cool counter, even after cut. Wrap in a cloth and refrigerate for longer storage. 

Fruit


Apples‐ Store on a cool counter or shelf for up to two weeks. For longer storage, place in a cardboard box in the fridge.
Citrus‐ Store in a cool place, with good airflow, never in an air‐tight container.
Apricots‐ Put on a cool counter at room temperature or fridge if fully ripe
Cherries‐ Store in an airtight container. Don’t wash cherries until ready to eat, any added moisture encourages mold.
Berries- Don’t forget, they’re fragile. When storing be careful not to stack too many high, a single layer if possible. A paper bag works well, only wash before you plan on eating them.
Dates‐dryer dates (like Deglet Noor) are fine stored out on the counter in a bowl or the paper bag they were bought in. Moist dates (like Medjool) need a bit of refrigeration if they’re going to be stored over a week, either in cloth or a paper bag‐ as long as it’s porous to keeping the moisture away from the skin of the dates.
Figs‐ Don’t like humidity, so, no closed containers. A paper bag works to absorb excess moisture, but a plate works best in the fridge up to a week un‐stacked.
Grapes- Make sure to select clusters that are free from molds if you plan to keep them in your fridge.  Another mistake people make when storing grapes is washing them before storing. While this may clean them and get rid of dirt on them, the water will have a negative effect on the skins of the grapes; making them mushier and promoting bacterial growth in the process.
Kiwi - Store at room temperature until ripe; then in fridge. Do not refrigerate longer than 1 - 2 weeks. 
Mangoes - Store on the counter until ripe or 2 - 5 days, then move to refrigerator, then keep for 5 - 7 days. If you want to freeze wash peel and slice into pieces. Place pieces on a cookie sheet until frozen then you can transfer to plastic bag.
Melons‐ Uncut in a cool dry place, out of the sun up to a couple weeks. Cut melons should be in the fridge, an open container is fine.
Nectarines‐ (similar to apricots) store in the fridge it is okay if it's ripe, but best taken out a day or two before you plan on eating them so they soften to room temperature.
Peaches (and most stone fruit)‐ refrigerate only when fully ripe. More firm fruit will ripen on the counter.
Pears‐ will keep for a few weeks on a cool counter, but fine in a paper bag. To hasten the ripening put an apple in with them.
Oranges - stay juicier when kept at room temperature. If possible place in a basket. The baskets are preferable to other containers because they permit the air to circulate freely around each piece of fruit.
Pomegranates‐ Keep up to a month stored on a cool counter.
Strawberries Don’t like to be wet. Do best in a paper bag in the fridge for up to a week. Check the bag for moisture every other day.

Do you have any tips for keeping foods from rotting?

Keeping it Fresh in Granolaville,


Resources: